# Gallery Integration

### **Finales Ergebnis 🎉**

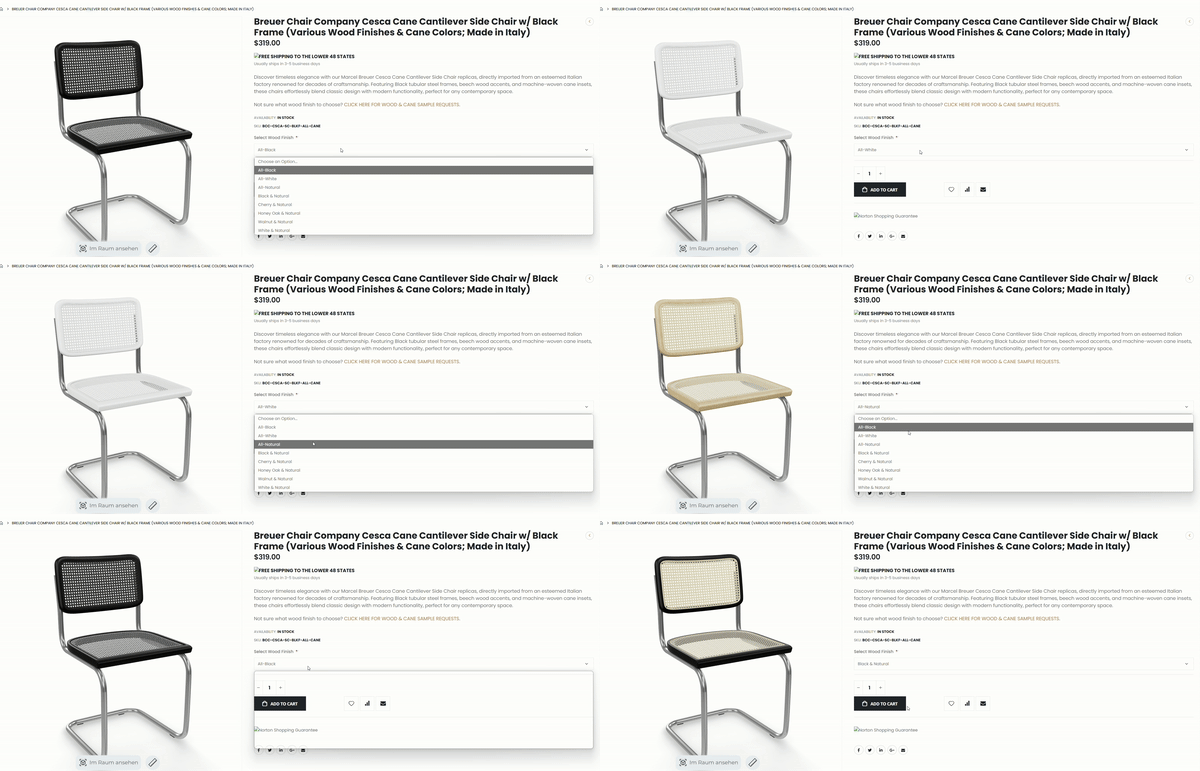
Vollständig integrierter **Viewer mit verschiedenen Varianten**

<figure><img src="/files/9HG048YDcT8MUqULqJMi" alt=""><figcaption><p>Completly integrated Viewer with different Variants</p></figcaption></figure>

## **Integrationsbeispiel**

### **Schritt 1: Mazing-Skript in das `<head>`-Element einfügen**

Um den **Mazing Viewer** zu aktivieren, füge das folgende Skript in den **`<head>`-Bereich** deiner HTML-Datei ein:

```
<!-- MAZING -->
<script src="https://cdn.mazing.link/mzg-in.js" defer="defer"></script>
```

**Hinweis:** Das `defer`-Attribut sorgt dafür, dass das Skript erst nach dem Parsen des HTML-Dokuments geladen wird und verbessert so die Performance.

### **Schritt 2: Eigenes Skript am Ende des `<body>` hinzufügen**

Erstelle ein neues Skript am Ende des **`<body>`-Elements**:

```
    ...
    
    <!-- MAZING -->
    <script>
        // YOUR SCRIPT COMES HERE!
    
    </script>

  </body>
```

{% hint style="info" %}
**Warum am Ende?**\
Damit wird sichergestellt, dass der gesamte HTML-Inhalt geladen ist, bevor dein Skript ausgeführt wird.
{% endhint %}

### **Schritt 3: Skript-Logik einfügen**

```
// Wait for the mazingProjectAvailable function to become available
// Ensures the header script is fully loaded
const waitForMazingFunction = new Promise((resolve) => {
  const interval = 50; // Check every 50ms
  const checkInterval = setInterval(() => {
    if (typeof mazingProjectAvailable === 'function') {
      clearInterval(checkInterval);
      resolve();
    }
  }, interval);
});


// Main script logic
const initializeScript = async () => {
  // Wait for Mazing to be ready
  await waitForMazingFunction;

  console.log('mazing configuration is active :)');
  
  // TODO: Add your custom logic here
  
}
  
// Start the initialization
initializeScript();
```

**Was passiert hier?**

* Wartet, bis **`mazingProjectAvailable`** geladen ist
* Gibt eine Bestätigung im Console-Log aus

{% hint style="info" %}
Tipp: Prüfe die Konsole, um sicherzugehen, dass alles funktioniert.
{% endhint %}

### **Schritt 4: SKU abrufen & iFrame erstellen**

```
const initializeScript = async () => {
  await waitForMazingFunction;

  // Get the iFrame source by calling mazingProjectAvailable
  const iframeSrc = await mazingProjectAvailable({
        customerName: 'YourMazingCustomer',
        getSKU: () => {
    
            // Extract SKU from the current product URL
            const url = window.location.href;
            const match = url.match(/\/products\/([^?]+)/);
            const currentProduct = match ? match[1] : null;

            return currentProduct;
        }
  });
  
  // TODO: Use iframeSrc to create and append the iFrame
  
}
  
initializeScript();
```

### **Was passiert hier?**

#### **SKU abrufen**

Die Funktion **`getSKU`** extrahiert die **SKU** aus der Produkt-URL mithilfe eines **regulären Ausdrucks**.

Beispiel:\
Eine URL wie `https://example.com/products/your-product` gibt **`your-product`** als SKU zurück.

***

#### **iFrame-Quelle generieren**

Die Funktion **`mazingProjectAvailable`** verwendet die SKU, um die **`iframeSrc`** zu erstellen, die benötigt wird, um den **Mazing Viewer** anzuzeigen.

***

#### **iFrame-Quelle verwenden**

Nachdem die **`iframeSrc`** generiert wurde, kannst du sie verwenden, um den Viewer auf deiner Website einzubetten.

Sobald du die **`iframeSrc`** hast, kannst du sie nach Bedarf anpassen und in deine Website einfügen.\
Weitere Details findest du in der **Script Integration Dokumentation**.

### **Schritt 5: iFrame erstellen**

```
const initializeScript = async () => {
  await waitForMazingFunction;

  // Retrieve the iframe source using mazingProjectAvailable
  const iframeSrc = await mazingProjectAvailable({
        customerName: 'YourMazingCustomer',
        getSKU: () => {
    
            const url = window.location.href;
            const match = url.match(/\/products\/([^?]+)/);
            const currentProduct = match ? match[1] : null;

            return currentProduct;
        }
  });
  
  let iframeElement;
  
  // Create the iframe element
  iframeElement = document.createElement('iframe');
  iframeElement.style.cssText = "border: 0; height: 100%; left: 0; position: absolute;  top: 0; width: 100%; background: white; display: none; padding-left: 22px;"; // max-height: 600px;
  
  // HERE WE USE THE IFRAMESRC !
  
  iframeElement.src = iframeSrc;
  iframeElement.allow = "accelerometer; autoplay; encrypted-media; gyroscope; picture-in-picture; camera *; xr-spatial-tracking;";
  iframeElement.allowFullscreen = true;
  iframeElement.setAttribute('allowusermedia', '');
  iframeElement.id = 'mazing-iframe';
  
  
  /* 
  * Now you can use this iframe and add it to the desired spot. Let's say you want
  * to put the iframe in a div in your shop with an id of 'gallery-div1' :
  */
  
  // Add the iframe to the desired container
  const iframeContainer = document.getElementById('gallery-div1');
  iframeContainer.appendChild(iframe);
  
}
  
initializeScript();
```

{% hint style="info" %}
**Was ist ein `<iframe>`?**\
Ein HTML-Element, das externe Inhalte (z. B. den Mazing Viewer) in deine Seite einbettet.
{% endhint %}

👉 `display: none` verhindert visuelle Glitches beim Laden.

{% hint style="info" %}
If no `iframeSrc` is provided, a `500 Server Error` will appear in the console.

* **Reason:** This error occurs when no model matching the SKU is found in the Mazing World.
* **Impact:** The error is non-critical and can be safely ignored as it does not affect the feature’s functionality.
  {% endhint %}

### **Schritt 6: Varianten wechseln mit postMessage**

Jetzt ist es an der Zeit, die für jede Variante definierte **ID / den Trigger** zu verwenden.\
Damit kannst du über deine eigene **Benutzeroberfläche** zwischen verschiedenen Produktvarianten wechseln.

<figure><img src="/files/RXcPhslZncvpOpVTiCNu" alt=""><figcaption></figcaption></figure>

Wenn du zum Beispiel ein **Dropdown-Menü** zur Auswahl von Varianten hast, kannst du auf die Auswahl des Nutzers reagieren und eine **postMessage** an den **Mazing Viewer** senden.

Angenommen, dein Dropdown-Menü hat die ID **`operations-dropdown`**.

So kannst du diese Logik implementieren:

```
    // This is the select element from our example
    const operations = document.getElementById('operations-dropdown');

    // We iterate through all options and add an event listener on each option
    for(let i=0; i < operations.length; i++) {

        const operation = operations[i];
        // This is the value of the option. This will become important later on!
        const dropdownItemValue = operation.value;

        operation.addEventListener('click', () => {

            console.log('clicked variant', dropdownItemValue);
            
            // Send the postMessage to change the Variant.
            iframeElement.contentWindow.postMessage({
                type: 'SWITCH_VARIANT',
                value: {
                    trigger: dropdownItemValue
                }
            }, '*');
        });
    }
```

Wenn eine Option im Dropdown angeklickt wird, sendet das Skript eine **postMessage** an den **Mazing Viewer**.

Der **Trigger-Wert** in der Nachricht entspricht der **ID / dem Trigger** der Variante, die du zuvor bei der Variantenerstellung definiert hast.\
Siehe → **Variant Operations**

Zum Beispiel:

Wenn die Option **„All-Black“** angeklickt wird, wird der Trigger-Wert **`all-black`** gesendet.

Dieser Wert aktiviert die Variante mit der entsprechenden **ID / dem entsprechenden Trigger**.

***

### **Schritt 7 (optional): Modell geladen / Modell-Sichtbarkeit**

Manchmal musst du bestimmte Aktionen verzögern, bis das **3D-Modell vollständig geladen** ist.

Das liegt daran, dass das Event **`MODEL_3D_LOADED`** sicherstellt, dass der Viewer bereit ist, Befehle über **postMessage** zu empfangen.

Wenn du beispielsweise vorausgewählte Varianten automatisch anwenden möchtest, kann ein zu früher Aufruf überschrieben werden – direkt nachdem das Modell fertig geladen ist, wird nämlich immer die erste Variante als ursprünglicher Zustand angewendet.

Um das zu vermeiden, solltest du auf das Event **`MODEL_3D_LOADED`** warten, bevor du deine Variantenauswahl sendest. Optional kannst du zusätzlich eine kurze Verzögerung einbauen, um sicherzustellen, dass der Ausgangszustand gesetzt wurde, bevor deine Änderungen angewendet werden.

{% hint style="info" %}

* **Modell-Laden und Sichtbarkeit**

  **postMessage-Operationen** werden erst gesendet, nachdem das **Modell vollständig geladen** ist.

  Das Modell beginnt erst zu laden, sobald das **`<iframe>` sichtbar wird** (also wenn `display: none` entfernt wird).
* **Warteschlange (Queued Operations)**

  Aktionen, die über **postMessage** ausgelöst werden, werden erst ausgeführt, wenn das Modell vollständig geladen ist.

  Du kannst entweder:

  * die **Steuerelemente erst nach dem Laden aktivieren**, oder
  * Aktionen **vorab in eine Warteschlange legen**, sodass sie automatisch ausgeführt werden, sobald das Modell bereit ist.
    {% endhint %}

{% hint style="warning" %}
Sobald das **3D-Modell vollständig geladen** ist, wird eine Aktion ausgelöst, um dich darüber zu informieren:

<kbd>**window\.top.postMessage({**</kbd>&#x20;

&#x20; <kbd>**type: 'MODEL\_3D\_LOADED',**</kbd>&#x20;

&#x20; <kbd>**value: {**</kbd>&#x20;

&#x20;   <kbd>**model: model**</kbd>&#x20;

&#x20; <kbd>**},**</kbd>&#x20;

<kbd>**}, '\*');**</kbd>

{% endhint %}

Hier ist ein Beispiel, wie du überprüfen kannst, ob das Modell geladen wurde, und deine Umgebung entsprechend vorbereitest:

```
// Listen for the MODEL_3D_LOADED event
window.addEventListener('message', (event) => {
    if (event.data.type === 'MODEL_3D_LOADED') {
        console.log('Model loaded');

        // Enable controls or add event listeners for options
        initializeColorOptions();
    }
});

// Make the iFrame visible to start loading the model
const iframe = document.getElementById('model-iframe');
iframe.style.display = 'block'; // or any other logic to unhide the iFrame

```

### **Variante erstellen und senden**

#### **Variante erstellen**

Dieser Schritt zeigt, wie du eine Variante (z. B. **„all-black“**) innerhalb deiner Konfiguration definierst.

<figure><img src="/files/kNEUmdCQx1l3JqMFnJ8F" alt=""><figcaption></figcaption></figure>

#### **postMessage senden**

Sende eine **postMessage** mit dem Trigger-Wert **`all-black`** von deiner Shop-Website, um zwischen Produktvarianten zu wechseln.

<figure><img src="/files/vLruq7WHlmRwtWyuZPM9" alt=""><figcaption></figcaption></figure>

### 🎉 **Glückwunsch!**

Du hast erfolgreich deinen ersten **Konfigurator** in deine Website integriert!


---

# Agent Instructions: Querying This Documentation

If you need additional information that is not directly available in this page, you can query the documentation dynamically by asking a question.

Perform an HTTP GET request on the current page URL with the `ask` query parameter:

```
GET https://mazingxr.gitbook.io/mazing-world/de/integration-types/gallery-integration.md?ask=<question>
```

The question should be specific, self-contained, and written in natural language.
The response will contain a direct answer to the question and relevant excerpts and sources from the documentation.

Use this mechanism when the answer is not explicitly present in the current page, you need clarification or additional context, or you want to retrieve related documentation sections.